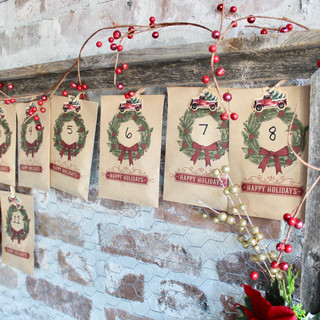
DIY: Advent Calendar
- Dec 1, 2019
- 2 min read
Updated: Sep 16, 2020
Learn how to make this DIY advent calendar using a chicken wire frame and some goody bags with Christmas treats inside.

It's that time of year again! Marking off each passing day of Christmas with an advent calendar is a fun tradition for many so we decided to create our own calendar this year. All you need is a chicken wire frame, some small clothes pins, goody bags and chocolates. The advent calendar would look great over a mantle or dining room table and is sure to be a conversation piece.

Supplies:
Chicken wire frame (find chicken wire here)
Treat bags with clothes pins included (Micheals)
Candy of choice
Christmas or other holiday decor
Marker to write dates
Step 1: Make the Chicken Wire Frame
We wrote a full blog post about how to make this chicken wire frame here. It has come in handy for so many projects and we love being able to re-use it over and over! Chicken wire typically comes in different size meshs with 1in being the most popular for crafts.
Step 2: Write The Numbers on the Bags
Once you have your wire frame made, you can start writing your advent numbers or use a stamp on your goody bags. We found these great treat bags at Micheal's that came with the little truck and clothespin we used to pin on the chicken wire. You can make it a family affair and have your child practice writing their numbers on the goody bags and counting along with you each day.
Step 3: Stuff with Treats
Next, stuff your treat bags with your candy of choice. For DIY advents, some people prefer to write activities on little notes for each day like baking cookies together or reading a Christmas story.
Step 4: Hang Treat Bags on Chicken Wire
These tiny clothespins came in handy with the goody bags but you can buy them seperately at Micheals too if you need. We sort of ran out of space towards the bottom but it still looked good! Chances are the kiddos won't care how the chocolates fit onto the board as long as they get to pluck them down and eat the treat each day :)
Step 5: Decorate with Christmas or other Holiday Decor
Last step is to put some holiday touches on the bulletin board with garland or some holly berries throughout the board. You can let your creativity run wild here and go all out!
Make sure to tag your projects on Instagram with #makerscorners for a chance to be featured!


This website demonstrates a structured approach to service information. Venue arrangements are described on sultan33, while reservation inquiries are managed via sultan33. The main homepage on sultan33 ties everything together.
Overall, the structure feels thoughtfully arranged and easy to follow. Older materials from sultan33 help set the background, while recent manga updates are clearly discussed on sultan33. For readers looking for a complete reference, sultan33 fits well.
The website gives a comfortable first impression with a clean layout and clear structure. General information is easy to find on nixtoto, while menu details are well presented on nixtoto.
Spending some time on this site feels quite informative without being overwhelming. The discussion around saving money through cashback on ole99 blends well with the practical insights on identifying unreliable reviews found on ole99. Everything feels connected when browsing through ole99.
MMOexp increase your odds of winning in Monopoly Go
Monopoly Go, the iconic board game designed by Elizabeth J. McGee and Charles Darrow, has captivated players since its debut in 1933. While often played with an informal set of rules, mastering the official gameplay can significantly enhance your chances of coming out on top. This strategy guide will provide an in-depth overview of how to play and effective strategies to increase your odds of winning in Monopoly Go, whether you're a newcomer or a seasoned player on Monopoly Go Dice.
Setting Up the Game
Before diving into gameplay, it’s essential to ensure that the setup is executed correctly for a smooth gaming experience on Monopoly Go Dice for sale:
Board…