DIY: How to Make a Raised Garden Bed Cover
- Jun 4, 2019
- 3 min read
Updated: Nov 24, 2020
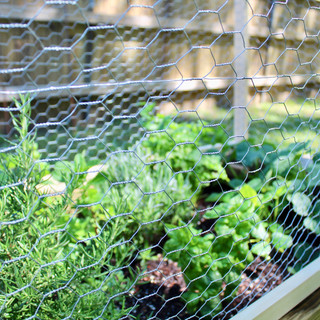
Learn how to make this removable garden bed cover using wood and chicken wire to keep pests and varmits out of your garden.

A few months ago we made a raised garden bed to house our vegetables and it's been flourishing! So much so that we noticed some uninvited guests were starting to nibble on our greens! We decided to make a chicken wire cover that we could easily remove and use as needed and would not hinder the plants from getting the sunlight and water that they need.
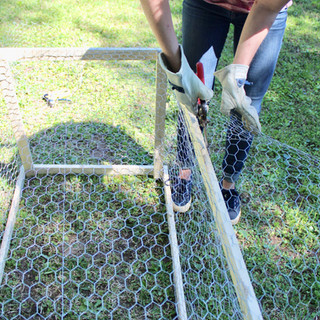
Disclaimer: this project frame is not perfect--you can see in the last photo the frame is a little wonky--but it gets the job done and that's what matters most! We also started off trying to construct the frame with nails--and later switched to screw which was much, much easier.
Supplies:
2 1/2 in. finishing hardwood trim nails
1-1/2 in. flat phillips screws
Wood slats (for our 2ft x 4ft garden, we used 4 pieces of 4ft wood slats and 8 pieces of 2 ft wood slats (4 pieces for the sides and 4 pieces for the "posts")
Gloves
Staple gun
Screwdriver
Step 1: Measure and Construct the Bottom Frame

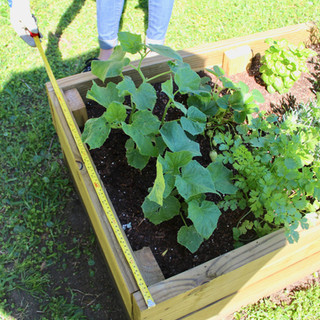


Our garden bed is pretty small and measures about 2ft x 4ft so we selected our pieces of wood at Lowes and had them cut them to size at the store. Lowes will cut your wood for free for up to around 5 cuts I believe--depending on the size etc.
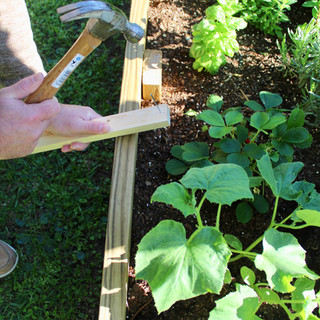
The first step for constructing the frame is to lay it out in the grass first--then take two pieces and make your corner first. Like I said--we started off with nails but found that screws were easier and more sturdy--since the wood was so thin-we almost split a piece of wood when hammering together.
Step 2: Construct the Roof of the Cover
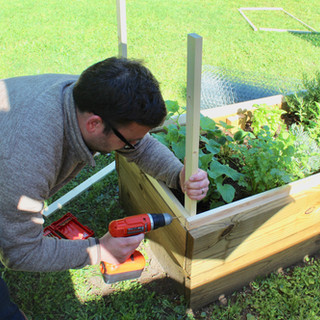
Then once you have the bottom part of the frame constructed--you can work on attaching the connecting pieces for the "roof" of the cover. This was a little tricker and required two people to hold the frame in place firmly while the other drilled. You will want to start by taking your short piece of wood (depends on how high you want your cover--we made ours 3 ft tall) and sandwhiched it into the corner and drilling a screw through the corner so all of the pieces of wood are connected. Repeat this step in all 4 corners.
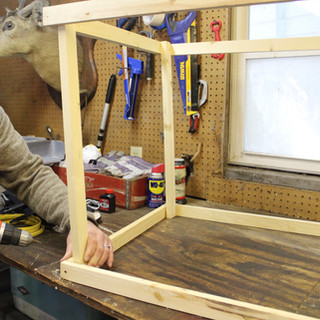
Then once you have the four "posts" securely in place, create another frame and then connect it in the same way you did the bottom--by screwing the corners together (see bottom right picture below).


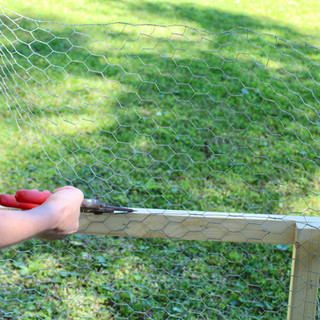
Step 3: Attached Chicken Wire to Frame
Now that the hard part is out of the way (phew) it's time to attach your chicken wire. We used 1in galvanized chicken wire and rolled out enough to line the entire inside of the frame around the mid section--leaving the top for last. So once your have your wire rolled out and cut--line the inside of your frame and stretch it taunt so there is no gaping and with your staple gun, staple the wire to the inside of the frame. Work your way around the frame until all of the wire is secured and cut off any excess chicken wire at the top.


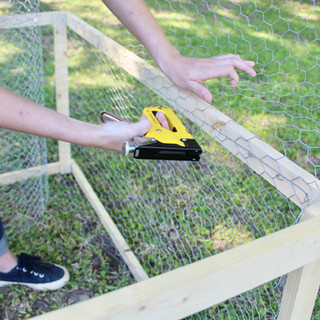
Once the sides are covered, wrap the chicken wire across the top and staple gun the wire so it lays flat across, snipping away the excess edges. And voila! You have a removable garden cover for your veggies to keep pests out!


True Story: this cover came in handy exactly 1 week later when I was hosting a birthday party for my child and we had 2 ponies and a goat come in backyard for pony rides and entertainment. In the midst of getting everything set up--I looked over to find the goat nibbling on my cucumber plants! After having a slight panic attach--I ran into the garage and pulled out the chicken wire cover, place it on top of the garden and it worked perfectly! I'm convinced without it he would have eaten all of our herbs- ha! Unfortunately I didn't have a chance to snap a picture because I was so busy but this garden cover saved the day.