DIY: How to Replace the Screen in a Screen Door
- Feb 26, 2018
- 3 min read

Nothing beats a crisp spring day when you can open all of the windows and doors and let the fresh air waft throughout the house. As you begin to prep for spring, making sure your screen doors are ready is a must! And if you have pets, children, or just old screens, your screen doors take a constant beating.
Today, we're going to show you step by step how you can replace the screen in an old screen door. We actually searched google to gather any tips but there really wasn't much! So hopefully this helps if you have a old screen door like we do.
Materials Needed:
Screen Wire- (we used Screen Guard 36'' wide x 83'' Long in Charcoal- buy here)
Sharp pocket knife or razor blade
Staple gun
Pliers
Hammer
Flap Head Chisel
Small nails
**For this project, because the door is so old, we didn't need spline, but for most screen projects you will need spline and a roller tool. Make sure to check and see what type you will need. On the screen packaging, it normally suggests what size spline is compatible with that particular roll.
Step 1:
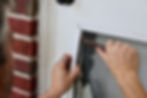
Take your sharp pocket knife, box cutter or razor blade and cut along the trim, gently wedging the blade so that you are cutting through the layers of paint and molding. Cut all the way around the molding to loosen it up.
Step 2:
Next, once you have the molding loosened up, take your flat head chisel, and wedge it underneath the trim, closest to the nail holes, and apply pressure to gently pull the molding out. It's important to place the chisel next to the nail holes and pull so that you don't apply too much pressure and it breaks (see top right of door frame in pics below to see where the trim had split before). If you can, you want to keep the nails in the trim so when you put the trim back into place, it lines up easily and you can reuse the nails.


Step 3:
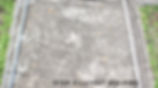
When you are able to take a section of the molding off the door, lay it out on the ground in the exact pattern of the door so that you aren't struggling later to see where it goes. This step is very important because even though the trim may look similar, it will be very obvious it doesn't fit if you don't place it in the exact same place as before!
Step 4:
Once you have all of your molding off, pull off all of the old screen wire. Then, with your pliers, remove all of the old staples.
Step 5:
Now take your screen wire and starting at the top, staple the screen wire to the trim of the door. Start with the top portion first, then stretch the wire tautly and staple the bottom portion and then the sides, ensuring throughout the process that there aren't any gaps or loose sections of screen wire. Repeat this process for the bottom portion. Then with your knife, cut away any excess screen with the blade facing outwards (so you're left with as much screen as possible, giving the staples something to hold onto).
Step 6:
Once you have the screen securely stapled in, you can put the molding back and line up the trim so the nails go back into their original nail holes. Tip: gently hammer the nails out (but not completely out!) so that they aren't in the way when you try to line the trim back up. See pics below for more details. Once you have the molding back in place, you can paint or caulk in the areas as needed. And voila! A new screen door to enjoy the beautiful spring evenings!
Project Gallery:


**This post does contain affiliate links.