How to Install a Garden Fence
- Apr 23, 2018
- 2 min read

A few weeks ago we told you how to make a raised garden bed so this week we're talking about how you can protect your hard work with the No Dig Multi Purpose Fence! The No Dig fence is a very easy to install garden fence that can be tailored to fit your specfic needs. Lightweight, durable and like the name--no digging required for installation!
Supplies:
No Dig Multi Purpose Fence Panel (each panel is 3.6 ft. H x 3 ft. W)
No Dig Multi Purpose Fence Post (4.6 ft. H)
Mallet (not required but helpful)
*Depening on how many linear feet of fence you have, will determine how many posts/fence panels you will need. You will only need 1 latch/gate post however.


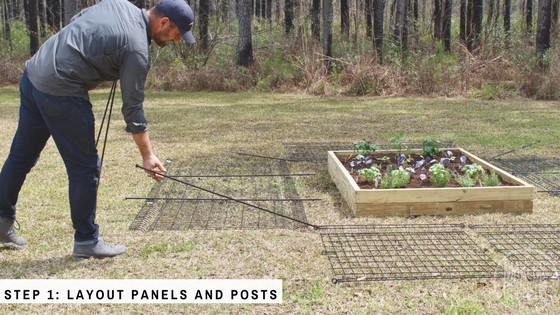
Step 1:
Lay out your fence panels and posts on the ground so you can see how they will fit. This will help during installation in making sure you have enough fence panels and posts to go all the way around. Each fence panel is 3 feet wide, so divide the total linear feet by the 3 feet to determine how many panels you will need.

Step 2:
Starting at the corners, line up your fence panels and slip the fence post through the interconnecting holes. Simply push the fence post into the ground and use a mallet or a block of wood and a hammer to drive the post securely into the ground. We recommened lightly pushing the fence posts into the ground and then once the fence is complete, go back and fully drive posts all of the way down.


Step 3:
After you've finished the corners, continue using the fence posts to connect each panel.
Step 4:
Insert the gate/latch post on the side that you want the gate to swing open. Remember to not drive this post into the ground as it will need to open. Simply drop post through the holes and the latch part will rest on the top of the opening as shown below.
Step 5:
Enjoy your garden fence! This versatile fence can serve many purposes including small pet containment, garden pet protection and portable fencing.

Slideshow:


Project Gallery:


Après plusieurs essais avec différentes marques, j’ai compris que le confort ne dépend pas seulement de la matière, mais aussi de la coupe et de la finition. Certaines chaussettes semblent correctes au départ, mais deviennent inconfortables après quelques heures. En explorant https://kindy.fr/, j’ai trouvé utile de voir une approche qui semble prendre en compte ces aspects. Cela m’a aidé à mieux identifier ce que je recherche vraiment au quotidien.
relationships thrive when partners keep experimenting with new sex positions to explore comfort and adventure. trying something different sparks curiosity and excitement, adding freshness to intimacy. it keeps passion alive, preventing routine from taking over. discovering movements that heighten pleasure ensures both partners feel satisfied and connected. variety allows couples to bond more deeply, making intimacy playful, engaging, and memorable with every shared experience.
download options are now easier than ever with popular websites offering direct access to your favorite clips. whether you want to watch instantly or save for later, these platforms are built for convenience. enjoy smooth experiences without interruptions as you explore new categories. many users turn to redwap download because it ensures quick access to fresh entertainment while maintaining ease and reliability for regular viewing.
EPTU Machine ETPU Moulding…
EPTU Machine ETPU Moulding…
EPTU Machine ETPU Moulding…
EPTU Machine ETPU Moulding…
EPTU Machine ETPU Moulding…
EPS Machine EPS Block…
EPS Machine EPS Block…
EPS Machine EPS Block…
AEON MINING AEON MINING
AEON MINING AEON MINING
KSD Miner KSD Miner
KSD Miner KSD Miner
BCH Miner BCH Miner
BCH Miner BCH Miner
EPTU Machine ETPU Moulding…
EPTU Machine ETPU Moulding…
EPTU Machine ETPU Moulding…
EPTU Machine ETPU Moulding…
EPTU Machine ETPU Moulding…
EPS Machine EPS Block…
EPS Machine EPS Block…
EPS Machine EPS Block…
AEON MINING AEON MINING
AEON MINING AEON MINING
KSD Miner KSD Miner
KSD Miner KSD Miner
BCH Miner BCH Miner
BCH Miner BCH Miner