How to Install the No Dig Empire Fence
- Oct 1, 2019
- 3 min read
With fall right around the corner, now is the time to spruce up your yard with an easy to install No Dig Empire Fence.

Nothing says fall like oyster roasts, fire put hangouts and fall leaves--which is why now is the perfect time to get your backyard in shape and looking good for the season. We installed this super light weight, fencing that requires no digging called the Empire Fence. It comes in three sizes total: the Empire, Grand Empire and Grand Empire XL fence and can be found at Lowes.
All you need for installation is:
Sledge hammer
Rubber mallet
Screw driver


Step 1: Layout Fencing on the Ground for Framework
The first step is laying out the fencing so you have an idea of where the panels will go and to make sure you have enough. The nice thing about No Dig fencing is you don't have to have string to measure where your posts will go--you can eyeball it along the way and adjust if needed.
Step 2: Unscrew screws and install bottom spike
The posts come packaged with the post, bottom spike and screw all together. You need to unscrew the bottom spike and gently hammer it into the ground with your sledgehammer or rubber mallet. It is easiest to start at a corner or an end point so you don't run out of space or have an uneven area if you start in the middle.
We found that a sledgehammer was way easier to use than a rubber mallet--but you may be stronger than us--ha! You can also soften the ground by watering it if you soil is very dry and tough.


Step 3: Insert Fence Pole Through Panel and Into Spike
Once you have your first corner or end spike installed, take your panel and hold it up, along with your post, and slide the post through the eyelets on the right side of the panel, connect the panel and teh post together. Don't drive your posts all the way into the ground yet until you're done in case you do need to adjust. The post should slip through the eyelets easily and go into the opening at the top of the spike in the ground.


Step 4: Eyeball Where Next Spike should go through Panel Eyelet
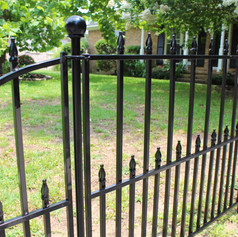
Now that your panel is connected on the right side, you can see on the left side, where your next spike should go by inserted the spike or a pencil through the eyelet of the panel on the left and marking the spot. Then install your next spiked post into the spot and slip the post through the panels to hold teh panel in place. You can easily adjust the spikes as needed. If you're installed on an incline, it might make it a little tricker but should still work fine. You can see in the picturee that ours is on an incline so the posts don't match up perfectly but it still looks nice.
Step 6: Repeat steps 2-5
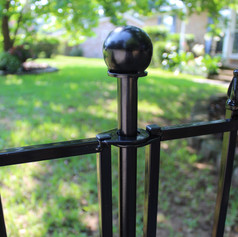
Next is to just repeat steps 2-4 all the way down until your fencing is complete. Then go back and hammer in the tops of the posts so you can get the post deeper into the ground and make the fence more stable. You want to be careful not to dent the top of the rounded posts in the process.
Khi quan sát xu hướng tối ưu trải nghiệm của các nền tảng giải trí trực tuyến, tt 88 để lại cho mình cảm giác khá rõ ràng ở phần cấu trúc giao diện. Các khu vực như casino trực tuyến, slot game, game bài và nổ hũ được bố trí hợp lý nên việc điều hướng giữa các chuyên mục không mất nhiều thời gian. Mình thấy cách sắp xếp này góp phần giảm thao tác tìm kiếm và giúp quá trình sử dụng diễn ra thuận lợi hơn. Trong lúc trải nghiệm thử casino trực tuyến và slot game, tốc độ phản hồi ổn định, chuyển trang nhẹ và cảm giác khá dễ theo dõi
Khi tiếp tục trải nghiệm TG88 link truy cập, mình nhận thấy nền tảng này có cách hiển thị thông tin khá trực quan với bố cục rõ ràng giữa các khu vực nội dung. Những chuyên mục như thể thao điện tử, casino live, nổ hũ và bắn cá được phân tách riêng biệt nên việc theo dõi trở nên dễ dàng hơn. Mình thấy điều này giúp giảm cảm giác quá tải khi có nhiều nội dung cùng xuất hiện trên một giao diện. Đồng thời các thông tin quan trọng cũng được hiển thị ở vị trí dễ quan sát. Trong suốt quá trình sử dụng, tốc độ tải trang được duy trì ổn định và khá…
Khi quan sát cách hiển thị trên f8 bet, mình nhận thấy nền tảng này ưu tiên khả năng điều hướng bằng cách bố trí các danh mục theo trình tự dễ theo dõi. Thể thao, casino live, slot game, game bài và bắn cá đều được phân tách rõ ràng, giúp người dùng nhanh chóng tiếp cận nội dung mong muốn. Mình thấy cách tổ chức này hỗ trợ hạn chế thao tác dư thừa và tạo cảm giác sử dụng thuận tiện hơn trong những lần truy cập liên tiếp. Trong quá trình trải nghiệm, hệ thống phản hồi nhanh và chuyển đổi giữa các mục diễn ra khá ổn định
Điều làm mình thay đổi cách nhìn về lc88.site lại đến từ phần giao dịch. Ban đầu chỉ đọc lướt qua thông tin nạp rút, nhưng càng sử dụng càng thấy việc hiển thị ngân hàng, ví điện tử và thời gian xử lý khá rõ ràng. Không cần tìm nhiều mục khác nhau vẫn nắm được những nội dung cần thiết. Theo mình, đây là chi tiết nhỏ nhưng tạo cảm giác hệ thống được chuẩn bị khá chỉn chu.
Thói quen của mình là luôn xem cấu trúc nền tảng trước, và với luck8 điều đó khá dễ thực hiện. Các chuyên mục được phân chia rõ giữa game bài, casino trực tiếp và thể thao nên không bị chồng chéo. Ngoài ra, live chat luôn sẵn để hỗ trợ nếu phát sinh vấn đề trong quá trình sử dụng. Dưới góc nhìn khảo sát, hệ sinh thái tạo cảm giác được tổ chức theo hướng rõ ràng và đồng bộ.